HiCookie smashes Core i7 3930X world records on GIGABYTE X79 UD3

Yesterday our resident overclocking guru HiCookie took his Intel Core i7 3930X CPU, a X79-UD3 armed with our new F7 BIOS release, copious amounts of LN2 and set down to some serious overclocking action. The resulting world records were soon posted on HWBot. Another day, another line drawn in the sands of high-performance computing. Pushing a CPU core frequency of 5643.3 MHz, related records for SuperPi and PiFast were unceremoniously smashed.

Catch the video below for a front row seat.

New 3930X Records;

Super Pi 1M - 6.64 seconds
Super Pi 32M – 6mins 8.516 seconds
PiFast – 13.02 seconds
CPUz – 5643.3MHz

You can find more details about the new F7 BIOS here, and the X79-UD3 here.

Tom’s Hardware coverage.

Read More..

How to setup a 4K Collage display rig on GIGABYTE dual thunderbolt motherboard

4k_banner_WHITE

Earlier this week we announced support for 4k UltraHD displays using Intel Collage technology and our dual thunderbolt motherboards. Although the setup process is actually reasonably straight forward, I thought today I’d give you quicky guide as to how it all works. Let’s kick off with a list of the things you will need
 

Stuff You Will Need

clip_image002
Motherboard – A PC built using any GIGABYTE 7 series dual Thunderbolt motherboard.

Processor Any 3rd generation Intel® Core™ i5 or Core™ i7 processor supporting Intel®HD4000 processor graphics.

HD Displays - Four displays supporting 1920 x 1200 or 1900 x 1080 native resolutions with DisplayPort interfaces. For Intel Collage vertical mode you may also require a stand to hold the four displays in position.

Intel Collage driver – This will be released later this month, downloadable from the motherboard product download page – as per a regular VGA driver update.

DisplayPort Splitter Dongles - Finally, you also need two DisplayPorts splitter dongles plus DisplayPort cables that allows you connect four displays using the onboard Mini DisplayPorts of your GIGABYTE motherboard.

4k-002 Here’s the splitter adapter from Lenovo that we used. 

Installation

Step 1: Connect the PC

First, you connect the two display port cables to the mini-Display Ports on the motherboard back panel. Each of these DisplayPort cables can then be connected to the splitter dongle. Note: Depending on which splitter dongle you are using, you may need to use DisplayPort to Mini DisplayPort adapter cables.

P1110098


Step 2: Connect the DisplayPort splitter dongles.

Now you can connect the two additional DisplayPort cables from each of the two splitter dongles. These will then be used to connect your standard HD displays.

4k-005

Step 3. Connect the Four Displays

Next you can connect the four DisplayPort cables coming from the two splitter dongles to the respective displays. In the image below you can see the four displays setup in vertical mode. You can see that purchased a really sturdy stand that can easily hold all Dell displays in place, offering plenty of adjustment points so you can get a really flat front viewing surface.
P1110113

Step 4. Install the Intel® Collage driver.

This is a special Collage driver developed by Intel and GIGABYTE that allows you create a 4K UltraHD resolution (3840 x 2400 pixel) desktop environment across your four standard HD displays. You can download the specific Intel® driver for your motherboard at the respective product page of our website. Follow the onscreen instructions during the installation process as you would with a regular VGA driver install. You then be asked to restart your system.
 

Step 5. Configure the Intel Collage Driver

Once installed, you can find the Intel Graphics and Media Control Panel in the bottom right corner of the screen. Right click the icon and select Graphics Properties. This is the software used to control and configure the Intel® Collage driver.

4k-008
For Vertical Mode on four displays, first you must select Clone Mode from the ‘Operating Mode’ drop-down menu. Then select a screen resolution of 3840 x 2400 or 3840 x 2160 depending on the native resolution of your displays.


4k-009 
  4k-010

For ‘Horizontal Mode’ you must first select ‘Extended Desktop’ from the ‘Operating Mode’ drop-down menu, then a screen resolution of either 7680 x 1200 or 7680 x 1080 depending on the native resolution of your displays.

And that’s it. You can find more info about compatible components and more here at the GIGABYTE website.


Read More..

GIGABYTE Z77X UP7 claims prestigious ‘Diamond Award’ on Hardware Heaven

gigabyte-z77x-up7-motherboard

In the last few weeks, the GIGABYTE Z77X-UP7 motherboard has started collecting accolades of the highest order. It’s been  Editors Choice and it’s been awarded Gold. Today however, it has arguably gone one step further, claiming the highly sought after and prestigious Diamond award from UK reviewers at HardwareHeaven.

Reviewer Stuart Davidson took a good hard look at our flagship Z77 board, and basically could not find a place where it skipped a beat. Here’s a sample of what Stu had to say:

“…overclocking was also impressive on the UP7 allowing us to exceed our previous maximum overclock for our i7-3770K on liquid cooling. Dual GPU scaling also worked well and the various voltage read points and onboard switches/buttons will make life easier for the enthusiast.

A class leading Z77 board from Gigabyte which offers a great level of performance in all areas backed by impressive build quality and features. One of only a handful of products to win our Diamond Award.”

diamond

Check out the full review at HardwareHeaven.com

You can find more info about the GIGABYTE Z77X-UP7 here.

Images courtesy of HardwareHeaven.com.

Read More..

Video Newegg TV complete a ‘Live Build’ based on the GIGABYTE G1 Sniper 5


Leon, our man in the US office, made it over to the Newegg offices to lend a hand with a Live Build they were undertaking based on a GIGABYTE G1.Sniper 5. Leon does a great job of answering comments and questions during the build which is lead by their ‘Resident PC-Building Lion’… also known as Paul.

Read More..

Update for the Latest Mac OS on Hackintosh Machine from TonymacX86

Featured today on Lifehacker.com is the latest up-date coming from our good friend TonymackX86. (click the image, or here).

Made for Hakintosh machines (non-Apple hardware that has been made—or "hacked"—to run Mac OS X), Tonymac put together a very easy to follow and comprehensive step by step guide to install Mac OS X Yosemite. From how to choose your hardware to troubleshooting solutions, this guide covers it all and makes installing a Mac OS on X86 platform a breeze!

Have fun!

image

Read More..

iPhone 5 recharges from GIGABYTE On Off Charge

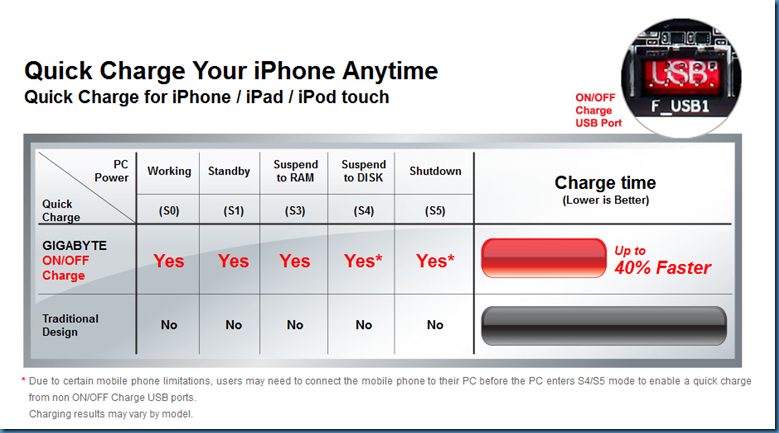
One area where GIGABYTE has focused a lot of R&D is USB power because this has quickly become the de facto mobile device charging standard for anything from smart phones and devices to remote controlled helicopters. With this in mind, we have introduced features/technologies such as one fuse per USB port, 3x USB Power, Electrostatic Protection, reinforced the power traces in our PCBs, and of course On/Off Charge for the iPod Touch, iPhone and iPad series of products. Now as screen quality, size and battery technologies change with each new product launch, so too do the recharging requirements, and this is why some folks had trouble charging their new tablets from their previous generation chargers a while ago.

So in case you’re wondering if your existing PC can recharge your new iPhone 5, fear not, it appears to be all good! We tested an iPhone 5 charging from a GIGABYTE motherboard with On/Off Charge (see the onboard USB headers with the red background below) and found that the maximum charge it took was 0.76A.

GIGABYTE On/Off Charge

image 


Some shots of the recharge:

IMAG0378 

IMAG0377

Read More..

Christian Ney breaks global RAM frequency world record on GIGABYTE A75 UD4H!

Champion Swiss overclocker Christian Ney is at it again with his insane memory frequency overclocking. He’s set the global memory frequency world record in the past and hasn’t let up hence a new bar has been raised to 1950.3(3900.6)MHz. CRAAAAYZEEE!

Christian used a GIGABYTE A75-UD4H, Gskill TridentX & AMD A8-3870 Llano CPU. Killer RAM clocking combo.

More info can be found at OCAHOLIC forum and result itself is at HWBOT.ORG.

864827

WithLogo

Read More..

Lucid Virtu MVP What it is and why you’ll want it on your motherboard

image

One of the real standout features of our Z68 series motherboards, was the inclusion on Lucid’s Virtu software on several models. For those of you who are new to Lucid Virtu, the elevator description would be that …“it basically allows you to switch between your onboard graphics and your discrete graphics card”. HHmm… and why exactly do I need that?

Switchable Graphics

Well there are a few reasons. The main benefit from this ‘Switchable Graphics’ feature, is that you can power down your graphics card when running less GPU-intensive 2D tasks like web browsing, watching video and general purpose productivity tasks, but then engage the discrete card when you need it, i.e. when cranking up your favorite 3D games.

One of the more obvious benefits from ‘Switchable Graphics’ is that today’s discrete graphics cards tend to consume a lot of power, adding significant wattage to your PC’s overall power consumption even while idling. Being able to switch off the discrete card when it wasn’t needed offers a tangible reduction in power consumption, and perhaps most significantly, a tidy reduction of your electricity bills too.

Other benefits included having access to Intel Quick Sync technology, a popular feature that discrete graphics card users would typically have to abandon, as Intel’s Quick Sync is a processor-bound feature that required you to use Intel’s processor graphics. With Lucid Virtu’s Switchable Graphics feature you could essentially have your cake and eat it too; want super fast video encoding thanks to Intel Quick Sync? No problem, select processor graphics. Want great 3D performance for your latest DX11 games? Switch to that monster card you paid all those dollars for…

Now you’re probably saying that this is old news, but there is a new feature in MVP that gives you control over whether to use processor graphics or the discrete GPU for each application. Here’s a peak at what it looks like.

image

But wait, there’s more to come..

However, since the Z68 launch, I’ve come to the conclusion that Lucid’s first iteration of their Graphics Virtualization software, Lucid Virtu, was actually just the beginning. Here was something that would grow, gathering momentum to quickly become a ‘must have’ feature for DIY PC builders and PC gamers. Having recently spent some time with the good people from Lucid, I’m now more excited than ever.

Here at GIGABYTE we’ve been working with Lucid to bring the latest Virtu MVP technology to our new 7 series motherboards. Trust me when I say that this is going to be popular bundle, and that’s because while Lucid Virtu MVP has the same switchable graphics feature that I describe above, they’ve also added new technologies that make it truly a game-changing feature (excuse the pun).

Virtual Vsync

If you’re using a powerful graphics card you may find that you’re getting some amazing frame rates at times, especially if you’re playing slightly older 3D games - many DX9 titles like Left4Dead and Portal 2 for example are still very popular. Today’s midrange and enthusiast graphics cards can rip through those games with blistering frame rates.

However, one problem that will arise with really high frame rates is that your monitor will almost always be limited to a refresh rate of around 60 Hz (can be equated to 60 frames per sec/FPS). Now if your game is running at 90FPS or more, this frame rate mismatch can result in a phenomenon known as ‘Tearing’. Check out the door frame and mirrors in the image below. You’ll see how tearing can look within a game. Not exactly the best graphical experience.

image

Most games offer a fairly clumsy solution to the problem, euphemistically referred to Vsync. If you enable Vsync within your game’s settings, the game will basically limit frame rates to be equal to that of your display – typically 60 FPS. This will result in a wholly inferior game experience. Frame rates of 80 and 100FPS are very much preferable. Most gamers agree, Vsync is a solution that can prevent tearing, but alas, at a significant cost.

Virtual Vsync however is a much more sophisticated solution which resolves the tearing problem, but crucially, without limiting the frame rate. In fact, Virtual Vsync delivers almost the same frame rate as you originally experienced. Again, Lucid has found a solution that means you get the best of both worlds. Fast frame rates of 100 and above, without tearing.

HyperFormance

The other new feature that we’re looking forward to offering you guys is what Lucid refers to as HyperFormance, a feature which claims to substantially improve overall 3D gaming responsiveness. By responsiveness we mean how well the game actually responds to your mouse and keyboard, a key factor that contributes greatly to a better overall gaming experience.

Without getting too technical, Lucid Hyperformance basically examines each piece of data as it passes through the graphics pipeline with the aim of eliminating redundant rendering tasks. This allows for shorter rendering cycles which, in turn translates into better overall responsiveness for you the gamer. We have toyed around with Hyperformance here in our labs, and we’ve been impressed at how the game just feels faster. If you were running at 100FPS, enabling Hyperformance will most likely give you even higher FPS. Not only does the FPS show marked improvement, but so too does the feel and responsiveness of the game.

A Bundle Worth Waiting For

Although at the moment we can’ talk about when our 7 series boards will hit the market, we can tell you that when they do, many models will come bundled with Lucid Virtu MVP. We’re really looking forward to that day, and we’re convinced that this new platform will be a big hit with casual and enthusiast gamers who want to enjoy the best 3D gaming experience possible.

Read More..

hicookie testing RAM on X79 UD7 at 2560MHz stable!

Hicookie chimed in on facebook doing some RAM testing with GIGABYTE X79-UD7 and Corsair GTX8. He posted a HyperPi 32M stable frequency at 2560MHz. Check it out.

ImageUpload.org2560-2

Read More..

Video TweakTown’s Deanzo shows us how to crank an FX 8150 Bulldozer to 7 78GHz on LN2

Armed with a GIGABYTE 900FXA-UD7 motherboard and a few liters of liquid nitrogen, Dean ‘Deanzo’ Smith shows us on video what it takes to cool an AMD FX-8150 processor all the way down to minus 180 degrees Celsius and hit incredible clock speeds in excess of 7.7GHz. You have to take look at this video; it’s great to get an experienced overclocker showing us step-by-step how to insulate the motherboard properly, patiently pouring in the LN2 until you get the desired CPU temperature.

Interestingly Dean recently took part in a GIGABYTE Extreme OC Workshop in Brisbane Australia where pros like himself and our very own Dino gave enthusiasts a chance to get hands on with LN2 overclocking. You can read Dean’s report on the event on TweakTown here.

4558_2_7_8ghz_amd_ln2_overclocking_at_gigabyte_extreme_oc_workshop_full

You can click here to learn more about the GIGABYTE 990FXA-UD7 featured in the video above.

Read More..


Powered by Blogger.